Friday, December 4, 2009

Three Tier Architecture in ASP.NET

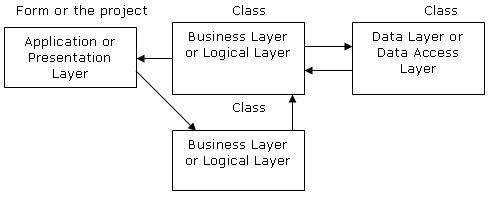
3-tier application is a program which is organized into three major disjunctive tiers on layers। Here we can see that how these layers increase the reusability of codes.

These layers are described below.

1. Application layer or Business layer
2. Business layer
a. Property layer(Sub layer of business layer)
3. data layer

Advantages of three Tier Architecture.

The main characteristic of a Host Architecture is that the application and databases reside on the same host computer and the user interacts with the host using an unfriendly and dump terminal. This architecture does not support distributed computing (the host applications are not able to connect a database of a strategically allied partner). Some managers found that developing a host application take too long and it is expensive. Consequently led these disadvantages to Client-Server architecture.

Client-Server architecture is 2-Tier architecture because the client does not distinguish between Presentation layer and business layer. The increasing demands on GUI controls caused difficulty to manage the mixture of source code from GUI and Business Logic (Spaghetti Code). Further, Client Server Architecture does not support enough the Change Management. Let suppose that the government increases the Entertainment tax rate from 4% to 8 %, then in the Client-Server case, we have to send an update to each clients and they must update synchronously on a specific time otherwise we may store invalid or wrong information. The Client-Server Architecture is also a burden to network traffic and resources. Let us assume that about five hundred clients are working on a data server then we will have five hundred ODBC connections and several ruffian record sets, which must be transported from the server to the clients (because the Business layer is stayed in the client side). The fact that Client-Server does not have any caching facilities like in ASP.NET, caused additional traffic in the network. Normally, a server has a better hardware than client therefore it is able compute algorithms faster than a client, so this fact is also an additional pro argument for the 3.Tier Architecture. This categorization of the application makes the function more reusable easily and it becomes too easy to find the functions which have been written previously. If programmer wants to make further update in the application then he easily can understand the previous written code and can update easily.

Application layer or Presentation layer

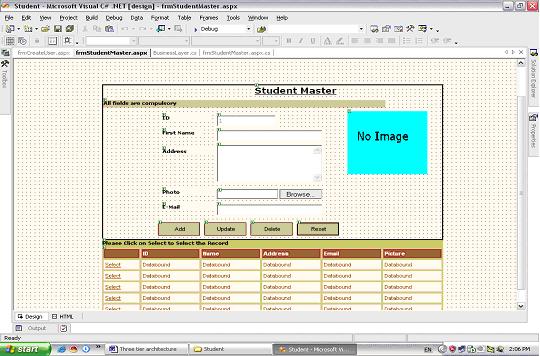
Application layer is the form which provides the user interface to either programmer of end user. Programmer uses this layer for designing purpose and to get or set the data back and forth.
Business layer

This layer is a class which we use to write the function which works as a mediator to transfer the data from Application or presentation layer data layer. In the three tier architecture we never let the data access layer to interact with the presentation layer.

a. Property Layer

This layer is also a class where we declare the variable corresponding to the fields of the database which can be required for the application and make the properties so that we can get or set the data using these properties into the variables. These properties are public so that we can access its values.

Data Access Layer

This layer is also a class which we use to get or set the data to the database back and forth. This layer only interacts with the database. We write the database queries or use stored procedures to access the data from the database or to perform any operation to the database.

Summary

  • Application layer is the form where we design using the controls like textbox, labels, command buttons etc.

  • Business layer is the class where we write the functions which get the data from the application layer and passes through the data access layer.

  • Data layer is also the class which gets the data from the business layer and sends it to the database or gets the data from the database and sends it to the business layer.

  • Property layer is the sub layer of the business layer in which we make the properties to sent or get the values from the application layer. These properties help to sustain the value in a object so that we can get these values till the object destroy.

Data flow from application layer to data layer

You can download sample three tier project, used for this tutorial. Here we are passing the code of the student to the business layer and on the behalf of that getting the data from the database which is being displayed on the application layer.

Presentation Layer:

private void DataGrid1_SelectedIndexChanged(object sender, System.EventArgs e)
{
// Object of the Property layer
clsStudent objproperty=new clsStudent();

// Object of the business layer
clsStudentInfo objbs=new clsStudentInfo();

// Object of the dataset in which we receive the data sent by the business layer
DataSet ds=new DataSet();

// here we are placing the value in the property “ID” using the object of the
property layer
objproperty.id=int.Parse(DataGrid1.SelectedItem.Cells[1].Text.ToString());

// In ths following code we are calling a function from the business layer and passing the object of the property layer which will carry the ID till the
database.
ds=objbs.GetAllStudentBsIDWise(objproperty);

// What ever the data has been returned by the above function into the dataset is
being populate through the presentation laye.
txtId.Text=ds.Tables[0].Rows[0][0].ToString();
txtFname.Text=ds.Tables[0].Rows[0][1].ToString();
txtAddress.Text=ds.Tables[0].Rows[0][2].ToString();
txtemail.Text=ds.Tables[0].Rows[0][3].ToString();
Image1.ImageUrl=ds.Tables[0].Rows[0][4].ToString();
}

Property Layer

// These are the properties has been defined in the property layer. Using the object of the property layer we can set or get the data to or from these properties.
public class clsStudent // Class for Student Table
{
private int _id;
private string _Name;
private string _Address;
private string _Email;
private string _Picture;

public int id // Property to set or get the value into _id variable
{
get{return _id;}
set{_id=value;}
}

public string Name
{
get{return _Name;}
set{_Name=value;}
}

public string Address
{
get{return _Address;}
set{_Address=value;}
}

public string Email
{
get{return _Email;}
set{_Email=value;}
}

public string Picture
{
get{return _Picture;}
set{ _Picture=value;}
}
}

Business Layer:

"Obj" is the object of the clsStudent class has been defined in the property layer. This function is receiving the property object and passing it to the datalayer class

// this is the function of the business layer which accepts the data from the application layer and passes it to the data layer.

public class clsStudentInfo
{
public DataSet GetAllStudentBsIDWise(clsStudent obj)
{
DataSet ds=new DataSet();
ds=objdt.getdata_dtIDWise(obj);// Calling of Data layer function
return ds;
}
}

Datalayer Layer

// this is the datalayer function which is receiving the data from the business layer and
performing the required operation into the database

public class clsStudentData // Data layer class
{
public DataSet getdata_dtIDWise(clsStudent obj) // object of property layer class
{
DataSet ds;
string sql;
sql="select * from student where StudentId="+obj.id+" order by StudentId";
ds=new DataSet();
// this is the datalayer function which accepts trhe sql query and performs the
corresponding operation
ds=objdt.ExecuteSql(sql);
return ds;
}
}


For More Information:- http://www.beansoftware.com/ASP.NET-Tutorials/Three-Tier-Architecture.aspx

Sunday, November 29, 2009

Confirmation before deleting a row with the gridview control


protected void GVEditCenter_RowDataBound(object sender, GridViewRowEventArgs e)
{

AddConfirmDelete((GridView)sender, e);
}


public static void AddConfirmDelete(GridView gv, GridViewRowEventArgs e)
{
if (e।Row।RowType == DataControlRowType।DataRow)
{
foreach (DataControlField dcf in gv।Columns)
{
if (dcf।ToString() == "CommandField")
{
if (((CommandField)dcf)।ShowDeleteButton == true)
{
e।Row।Cells[gv।Columns।IndexOf(dcf)]।Attributes
।Add("onclick", "return confirm(\"Are you sure?\")");
}
}
}
}
}

Monday, November 2, 2009

Implementing KeyBoard Shortcuts on an ASP.NET Hyperlink Control using jQuery

Popular Web apps like Gmail and Windows Live Mail feature Keyboard shortcuts, which help you save time by executing common operations using the Keyboard, without having to switch between the keyboard and mouse. In this short article, I will demonstrate how to use jQuery to implement keyboard shortcuts on an ASP.NET Hyperlink control. This article is a sample chapter from my EBook called 51 Tips, Tricks and Recipes with jQuery and ASP.NET Controls.
Note that for demonstration purposes, I have included jQuery code in the same page. Ideally, these resources should be created in separate folders for maintainability.
Let us quickly jump to the solution and see how we can implement KeyBoard shortcut on the Hyperlink control
<head runat="server">
<title>Implement KeyBoard Shortcuts on Hyperlinkstitle>
<script type='text/javascript'
src='../Scripts/jquery-1.3.2.min.js'>
script>
<script type="text/javascript">
$(function() {
$(document).keyup(function(e) {
var key = (e.keyCode ? e.keyCode : e.charCode);
switch (key) {
case 49:
navigateUrl($('a[id$=linkA]'));
break;
case 50:
navigateUrl($('a[id$=linkB]'));
break;
case 51:
navigateUrl($('a[id$=linkC]'));
break;
default: ;
}
});
function navigateUrl(jObj) {
window.location.href = $(jObj).attr("href");
alert("Navigating to " + $(jObj).attr("href"));
}
});
script>
head>
<body>
<form id="form1" runat="server">
<div class="tableDiv">
<h2>Use Keyboard Keys 1, 2 or 3 to invoke respective
websitesh2><br />
<asp:HyperLink ID="linkA" runat="server"
DotNetCurryasp:HyperLink><br /><br />
<asp:HyperLink ID="linkB" runat="server"
SqlServerCurryasp:HyperLink><br /><br />
<asp:HyperLink ID="linkC" runat="server"
NavigateUrl="http://www.devcurry.com">
DevCurryasp:HyperLink><br /><br />
div>
form>
body>
html>
Implementing a Keyboard shortcut in jQuery is relatively simple as shown here. The code first captures the keyup event and the key is detected using the keyCode or charCode.
$(document).keyup(function(e) {
var key = (e.keyCode ? e.keyCode : e.charCode);
In the code shown below, if the key = 49, digit 1 is pressed by the user and the first Hyperlink is auto-clicked. Similarly if the key = 50 or 51, then digit 2 or 3 are pressed respectively and the 2nd or 3rd hyperlink is autoclicked. Once the key matches any of the switch case statement, the function navigateUrl() is called passing in the respective hyperlink control object to the function. So if the user pressed 1, the first hyperlink control object is passed to the function as shown below:
switch (key) {
case 49:
navigateUrl($('a[id$=linkA]'));
break;
The navigateUrl function looks like this:
function navigateUrl(jObj) {
window.location.href = $(jObj).attr("href");
}
The function accepts the hyperlink object and sets the ‘window.location.href’ to the href attribute of the Hyperlink passed in. This is how we invoke actions with shortcut keys.
Tip: keyCode represents the actual key pressed as a numerical value, whereas charCode gives the ASCII/Unicode value of the key press result (for eg: Shift + A). Firefox and other browsers also support ‘e.which’. IE and Opera does not support charCode.
Keyboard shortcuts improve productivity by accomplishing tasks more quickly and without much effort. In applications, where the user has to select from a variety of actions to perform, keyboard shortcuts can save on time and effort.
You can see a Live Demo over here. The entire source code of this article can be downloaded over here

Wednesday, September 30, 2009

Export ASP.NET GridView to Excel


protected void Page_Load(object sender, EventArgs e)

{

if (!Page.IsPostBack)

{

BindData();

}

}
private void BindData()

{

string constr = @"Data Source=XYZ;Initial Catalog=testdatabase;Persist Security Info=True;User ID=ABC;Password=abcdefg;";

string query = "SELECT * From emp1";

SqlDataAdapter da = new SqlDataAdapter(query, constr);

DataTable table = new DataTable();

da.Fill(table);

GridView1.DataSource = table;

GridView1.DataBind();

}

protected void btnExcelReport_Click(object sender, EventArgs e)

{

Response.Clear();

Response.AddHeader("content-disposition", "attachment; filename=UserRecord.xls");

Response.Charset = "";

Response.ContentType = "application/vnd.xls";

StringWriter stringWriter = new StringWriter();

HtmlTextWriter htmlWriter = new HtmlTextWriter(stringWriter);

GVExamUserSearchList.RenderControl(htmlWriter);

Response.Write(stringWriter.ToString());

Response.End();

}

Sometimes, when you render any asp.net control dynamically as I am doing with the GridView control in this tutorial, you can get HttpException with the following message:


Control 'GridView1' of type 'GridView' must be placed inside a form tag with runat=server.


The problem can be solved by overriding Page class VerifyRenderingInServerForm method which confirms that an HtmlForm control is rendered for the specified ASP.NET server control at run time.

public override void VerifyRenderingInServerForm(Control control)

{ }


When you will click the Export to Excel button you will see the following dialog box asking you to open or save dynamically generated Excel file.


Wednesday, September 23, 2009

//*// GridView With Radio Buttion //*//


"<Columns>
<asp:TemplateField HeaderText='Select'>
<ItemTemplate>

<input name='MyRadioButton' type='radio' value='<%# Eval('ExamId') %>' />
</ItemTemplate>
</asp:TemplateField>
<asp:BoundField HeaderText='CentreCode' ReadOnly='True' DataField='CenterCode' />
<asp:BoundField HeaderText='CentreName' ReadOnly='True' DataField='CenterName' /> <asp:BoundField HeaderText='ExamDate' ReadOnly='True' DataField='ExamDate' />
<asp:BoundField HeaderText='ExamTime' ReadOnly='True' DataField='ExamTime' />
</Columns>"

Tuesday, September 22, 2009

//*// Select serial number with a list of columns //*//


select
(select count(*) from emp where empname <= n.empname) as SRNo,
empname from emp n
order by empname

Monday, September 21, 2009

//*// Add serial or sequential number column in a GridView control //*//

< asp:TemplateField HeaderText=”S/No” >

< ItemTemplate >

< %#Container.DataItemIndex+1 % >

< /ItemTemplate >

< /asp:TemplateField >

//*// Code in Code behind of delete button in GridView //*//


int selectedRowindex =(int)myDataGrid.DataKeys[e.RowIndex].Value;
string FirstcoloumValue = myDataGrid.Rows[e.RowIndex].Cells[0].Text;

//*// Regular Expression For Double Value //*//


[0-9]+(\.[0-9][0-9])?
Ex : 0.11,11,1.11

—————-javascript function for custom validator control——————
function check() {
var regx = /^([-]?)([0-9]+)((.[0-9]{2})?)$/;
var m = regx.test(document.all.txt.value);
if (m == true) {
alert(”right”);
}
else {
alert(”error”);
}
}

//*// Transaction in sql with c# //*//

public int DeleteProblems(int _intProblemId)
{
int icheck = 0;
using (SqlConnection connection = new SqlConnection(_strConnectionString))
{
SqlCommand command = connection.CreateCommand();
SqlTransaction transaction = null;

try
{
// BeginTransaction() Requires Open Connection
connection.Open();

transaction = connection.BeginTransaction();

// Assign Transaction to Command
command.Transaction = transaction;

// Execute 1st Command
command.CommandText = “delete from ForumSolution where ProblemId=’” + _intProblemId + “‘”;
icheck=command.ExecuteNonQuery();

// Execute 2nd Command
command.CommandText = “delete from ForumProblem where ProblemId=’” + _intProblemId + “‘”;
icheck=command.ExecuteNonQuery();

transaction.Commit();
}
catch
{
transaction.Rollback();
throw;
}
finally
{
connection.Close();
}
return icheck;
}

}